Sunday, April 21, 2013

Chicken Wings Demystified

Hoisin Chili Chicken Wings.  Photo by Rob Robitaille
When people talk about wings, they always talk about the sauce and gloss over the flavor and texture of the actual wing.  There is much more to chicken wings than the sauce.  Seems to me that the places that sell wings forget that and, instead, put the sauce in the spotlight.  But, the sauce is supposed to compliment the chicken wing.  If it is a good chicken wing, one could argue that it really doesn't need sauce. I admit that I am kind of a chicken wing snob.  I think that most places under-cook their wings.  Granted, they are done and safe to eat, but the meat still clings to the bone and you have to put a bit of effort in gnawing on them.  I hate that.  A lot.  I know a lot of people that go fore the boneless wings, which aren't wings at all.  When I ask them why, I get the same answer; they don't like gnawing on bones.  I contend that you shouldn't have to work at chicken wings, if made properly.  And to be made properly, you need to have your head in the game.

Chicken wings are one of those intuitive things that you can't simply slap a temperature and time on and, all will be well, and people will cheer your name and make toasts to you all night long.  There is a fine line between tender, pull-off-the-bone goodness, and past tender, kind of dry, but still falling off the bone wings.  Let us not forget about the above mentioned not-so-tender-stuck-to-the-bone-yet-done-enough-to-be-safe-to-eat wings.  So, what's the secret?  Practice, practice, practice.  Also, don't fall into the pitfall of underestimating these things because they are so small and simple looking.  They take a fair amount of thought to do properly.

The sauce is ancillary to the whole process.  If you like creating your own sauces, like I do, then do it.  Go crazy.  But if that is not your bag, then find yourself something from the market that you enjoy.  Ultimately, you are going to make chicken wings, not sauce with chicken wings.  To start with, you need wings.  I usually buy a family pack of wings for me and my wife and usually can get one meal with left-overs.  The wing is made up of three parts: the drumette, flat, and the tip. Like most wing restaurants, I split my wings into the three parts.  The tips go into a vacuum bag and are saved for stock.  The rest is dinner.

Next, I dredge them in a mixture of flour, cornstarch, and salt.  Some could argue that you don't need this step, but it is up to you.  Then, I fry them in canola oil at a temperature of around 350-360.  Typically, they will take about 16-20 minutes depending on how big the wings are.  I start to really pay attention to them at around 15 minutes and check for color and how much steam is still rolling off the deep fryer.  Again, this takes practice.

While they are frying, I dig out my huge stainless steel bowl.  I have never measured, but it has to be at least 20" across with very slopped sides, which is perfect for tossing the wings in the sauce.  Then I add some sauce to the bowl, and when the wings are done, in they go for a nice bath of sauce and out on the plate.

I know of few people who make their own wings, and it is a shame, really.  Yes, you need to deal with some kind of deep fryer and the left over oil, but it is worth it.  With a little practice, you can make better wings than the restaurants.

Saturday, April 20, 2013

Sweet and Sour Spam - Just Because

Photo by Rob Robitaille
Nothing makes sense these days.   I walked past our koi pond on the way to my truck, which sits outside the garage because my motorcycle is out and ready to go...if it ever warms up.  The pond was mostly frozen over again and I had to scrape off the windshield because we had record (or near record) lows last night.  I would love to see some warm rain instead of sleet, snow, and ice.  May is just a few days away, dammit!  But not everything that fails to make sense is a bad thing.

The other evening, after working on some remodeling projects, I realized that it was getting late and I hadn't eaten.  As it would happen, I didn't have any meat that wasn't frozen.  So, I started looking through the freezer for something that would thaw quickly and satisfy my craving for meat.  Nothing.  I was just about to give up when I spotted it sitting on my pantry shelf.  A can of Spam.  Now, there appear to be two groups of people in the world, those that love Spam and those that hate Spam.  But, after talking to enough people over the years there are actually four:
  1. Those that love Spam and are proud of it.  They may even ask a person at the grocery store where the Spam is, even though they know exactly where it is.  It is their way of letting everyone know they eat Spam and are not ashamed of it.
  2. Those that hate Spam, and really do.
  3. Those that say they hate Spam, but have never even tried it.
  4. Those that say they hate Spam, but enjoy it at home, with the curtains drawn.  They buy it at the store, looking around to make sure no one sees them, then they snatch several cans, put it in their cart and cover it up with the organic tofu and soy milk.  The only person that sees it is the cashier, so they nervously tell them that it is for their grandmother, who just "loves the stuff" because she grew up during the war.
I digress.  So, Spam in hand, my next step was what to do with it. Sweet and sour Spam!  Just what I really wanted, I came to realize.  I think I saw this on a travel show once, but can't remember exactly.  The beauty is that it is really simple, and to my surprise, was very delicious indeed.  After all, isn't cooking all about creativity?  It kind of makes sense, but kind of doesn't, which usually means it has to be good.  It just shows you that you can make something out of seemingly nothing.  What's next?  Maybe Spam Parmesan from the M*A*S*H episode Too Many Cooks.

Sunday, April 7, 2013

Poutine and Things a la Poutine

A variation on Poutine.  Photo by Rob Robitaille
There are a lot of foods that make perfect sense, foods that go together like they were made for one another; ham and eggs, macaroni and cheese, pizza and beer. French fries, gravy, and cheese curds?  Maybe not so much.  Of the people I have talked to, they fall into two distinct groups: those that love poutine and those who have never heard of it.  And most of the people who have never heard of it seem to always say the same thing like "Huh, that doesn't sound like it goes together."  But, take it from the poutine lovers of the world, it does go together and it's really good.

Poutine is a popular French Canadian invention, but outside of Canada, even in a bordering state like Minnesota, most people have never heard of it.  In its pure form, poutine is fries with cheese curds and gravy.  The method of how the fries are cooked, the type of curds, and the style of gravy are hotly debated and I don't think I can really add much to that debate, nor do I want to.  However, even in its birth place, there are many riffs on it, even as over-the-top as lobster poutine.  All I know is that poutine is great and if there was a place that sold poutine near my favorite watering hole back in college, I would have been there a lot.  I can't think of anything else that goes better with, or after consuming large quantities of beer.  In fact, poutine can be fairly complex in flavor and a properly matched beer can push it to a whole new level.

The "poutine" pictured above is made from some basic fries, cheddar curds, and the left over braised beef chuck roast from my previous post.  As long as you don't care, that no matter what riff you choose to make, it will always be wrong in the eyes of the self proclaimed poutine purists, the sky is the limit.  

Poutine

  • French fries
  • Cheese curds
  • Gravy
Place a pile of hot fries on a warm plate (I think a small cast iron pan looks cool and keeps the fries warm longer).  Place a hand full of curds on the fries and top with steaming hot gravy.  This will help melt the curds.  Serve with a suitable beer.

Riffs on the gravy:
  • Braised beef chuck roast (like I did)
  • Left over pot roast, shredded, with carrots, potatoes, and gravy
  • Beef stew
  • Chicken a la king (Then you could call it chicken a la king a la poutine. HA!)

Sunday, March 17, 2013

Braising - Another Essential Skill


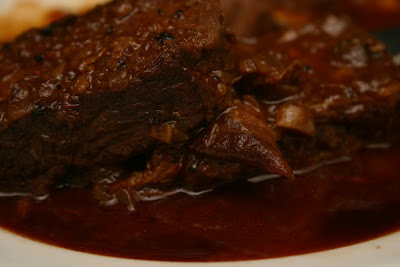
Beer Braised Chuck Roast.  Photo by Rob Robitaille
Have you ever braised anything?  I bet you have.  Pot roast is one of the most common dishes that is braised.  The cut of meat is a roast, but you are not roasting it, you are braising it.  Loosely defined, braising is cooking something, usually a tough, flavorful cut of meat, in liquid, with relatively low heat, over a long period of time in a covered vessel.  This happens to be one of my favorite cooking methods, mostly in the cold Minnesota winter months.  Almost anything can be braised, but the bulk of braising time probably goes to meats. Beef chuck roast, or short ribs are right at the top for me.  The main point is that braising is particularly suited to softening up tough cuts of meat, which tend to have a lot of flavor, but also a lot of connective tissue that need the slow moist heat to break down.

So let's do a walk through of a simple braise.  Maybe I shouldn't even use the word simple, because braising is simple, in and of itself.  Anyone can do it, no matter what their skill level.  Ultimately, there are three basic steps in braising: 1) select a braising vessel, 2) brown the meat, 3) make a braising liquid, and 4) braising.

Selecting a Braising Vessel

There are only a few considerations for this.
  • It should be fairly heavy an a good conductor of heat.  Cast iron is an excellent choice.  I use an old school cast iron Dutch oven for this.
  • It should be fairly deep so there is plenty of space over the contents.
  • It needs to have a lid.
  • It should be oven safe, however, you can braise on the stove top, but then you need to tend it much more.

Browning the Meat

Browning the meat does a couple of things.  Most importantly, it adds flavor, but also important, it also helps to keep blood from coagulating in the sauce by making a crust on the exterior.  Some people like to dredge the meat before they brown it.  There are many apparent reasons for this floating around.  Some say it adds flavor, a better crust, or helps thicken the eventual sauce.  This is something that can be debated ad nauseam; in fact, it still is.  Personally, I don't dredge in flour.  I am not convinced that browned flour adds any flavor that I desire, nor does it seem to make a better crust.  I also don't buy the whole thickening argument either since by the time the flour is brown, it doesn't thicken all that well anyway.  So, I just don't do it.  If you want to, knock yourself out.  That being said, salt the meat and brown it in some canola in the braising vessel over moderately high heat.  We are looking for a nice sear on ALL sides.  When done, remove to a plate.

Making the Braising Liquid

Now, this may be as simple as just adding some water or stock, in which case, you can leave the meat right in the vessel.  However, I like to remove the meat and create the braising liquid without having to work around the meat.  In the example of the beer braised chuck roast, I threw in a couple of diced onions and slowly browned them in the remaining fat.  Then I added some crushed garlic and cooked it for another minute or two.  I then added some flour and stirred that into the onions and garlic.  Once that was incorporated, I added about a pint of chicken stock and a pint of beer.  I used a mild lager, but if you want to fortify the flavor a bit more, you can use something darker and maltier.  Heck, you can even use stout if that is the flavor you are after.  I wanted a lighter flavor, so I stuck to lager.

I then added about 6-7 allspice berries and about 10 pepper corns, toasted and cracked.  I also added a bit of ground Ancho chile, a dash of hot sauce, a bay leaf, a tiny splash of fish sauce*, and a dash of sherry vinegar.  At this point, don't add salt, because you will be reducing the sauce.  Once reduced by 1/4 or 1/3, you can adjust the seasoning and add your meat and cover the vessel.

A note on the amount of braising liquid: If you are looking to braise a larger cut, like a roast, you only need to have the liquid come up about half way on it.  The top of the meat will take on a nice color and flavor that way, not to mention you won't need to have an excessive amount of liquid.  Unless you want to.  The neat thing about this is that there are no hard and fast rules. In this particular example, I browned the whole roast, then braised it with liquid about half way up.  Then, towards the end, I removed it, sliced it into chunks and placed it back into the liquid, which now covered the meat completely, and finished it off.  I could have cut the meat up before I browned it, but that was not the texture I was ultimately after.  This yielded a particularly melt-in-your-mouth tenderness that I wanted.  Yes, there are a lot of subtleties to braising, and that one there was pretty darned subtle, but over time you will start to see them.

Braising

There is no actual temperature assigned to braising other than it is typically on the low side.  When I braise on the stove top (when my oven is in use and I will be around to tend it), I like to keep the temperature at a lazy bubble.  Just between a simmer and a low boil.  However, I typically like to braise in the oven somewhere in the 200-225 degree F range.  Not only does the oven stay nice and constant, but the best thing is, you can walk away and ignore it.  Smaller cuts of meats take less time that larger cuts, obviously, and a large cut like a whole roast can take 5-7 hours depending on the temperature.  Another great thing about braises is that they can be done a day or two ahead then reheated for a meal, at which point you can make any adjustments on the sauce, if you wish, such as further reduction to make a glaze, or to thicken it with a roux or corn starch slurry.  Talk about a low stress dinner party option.

*Fish sauce is my secret weapon.  I always have some on hand.  When used properly, you don't really detect any fish flavor, but it adds a savory richness to just about anything you add it to.  I use it in cream sauces, braising liquids, salad dressing, tomato sauces, soups, mac and cheese, anything that needs a bit of savory support.

Sunday, March 10, 2013

Fromage Fort

Photo by Rob Robitaille
Have you ever wondered what to do with those little chunks of cheese that collect in your refrigerator cheese drawer?  Alone, they are not big enough to do anything worthwhile with, but together they are the building blocks for something delicious.  Once again, leave it to the French to re-purpose old cheese into something great.  I'm talking about Fromage Fort, which literally translates to strong cheese.  Essential, it is left over cheese turned into a spread that can be eaten with crackers or slathered on bread and broiled. The only caveat to this is to be careful if you decide to use blue cheese as it can tend to get really strong and boss the other flavors around. Other than that, pretty much anything goes and you are only limited by your creativity.  The best thing about Fromage Fort is that no two batches taste alike, which I think is really fun because each time is a surprise. This works great as an appetizer, or as a snack on a cold Minnesota winter day.  Since Fromage Fort can be all over the flavor scale, this recipe is a very loose guideline, more of like a thought map that I use when making it.  Seriously, it is hard to screw this up.

Fromage Fort

  • Left over cheese - about 1 lb. (In this example, I used mostly Cheddar.  It also had Brie and a couple of other firm cheeses that I can't remember right now.)
  • 2-4 T. butter
  • 1-2 cloves of garlic, peeled
  • Dry white wine
  • Salt and pepper to taste
We will assume that the cheese is free of mold and dry spots.  I am not going to provide direction on whether or not you should use a particular piece of cheese if it has mold.  Personally, mold on firm cheeses doesn't scare me and I trim that off. Softer cheese, not so much.  Then cube your cheese and place it in a food processor.  Add the butter and garlic and process until a ball forms.  At that point, start slowly adding the wine until the cheese becomes creamy and smooth.  You may need to scrape the sides of your food processor a few times during this.  Adjust the seasoning with salt and pepper and process another 20-30 seconds.  You just made Fromage Fort!  You can use it immediately, or refrigerate for up to a week.  I think it tastes better if you leave it for a couple days, but it's pretty darned good right away, albeit much sharper.

It will firm up in the refrigerator, so you will want to let it come up to room temperature before serving it as a dip or spreading on bread.  If you choose to broil it, you need to keep a close eye on it as it goes really fast.  I typically broil it with my rack in the middle or one up from middle.

Saturday, March 9, 2013

The Humble French Tomato Tart

Photo by Rob Robitaille
I fell in love with the tomato tart last year during the height of the tomato season.  Garden tomatoes are fantastic, but their season is way to short, which is why we eat tomatoes until we don't want to see them again for a long time.  Last week apparently marked the end of a "long time" and I started pining for the beloved tomato once again.  Fortunately, there happens to be an outfit in my town that grows hydroponic tomatoes all year long, so they are pretty easy to come by.  Every grocery store in town has piles of these gems, still on the vine.  There are many ways to prepare fresh tomatoes, but on a cold, gray Minnesota winter day, I was in the mood for something comforting.  Fortunately, we were having dinner guests and I needed a starter course.  Perfect.

 This thing is so simple, it barely can be called a recipe, but like I said before, sometimes the simple things are the best.  When I say simple, I am assuming that you don't plan to make your own puff pastry.  Personally, I hate working with dough, and avoid it as much as possible.  I hope you give this one a try.  It is great as part of a meal, or as a light lunch all on its own.  Enjoy.

French Tomato Tart

  • 2-3 tomatoes
  • 1 c. grated Gruyère cheese
  • 1 sheet of puff pastry
  • Salt and pepper to taste
Preheat your oven to 375 F.  Slice your tomatoes fairly thin, then arrange them in a single layer on a baking sheet lined with paper towels.  Place a layer of paper towel on top; this will remove some of the excess moisture. In the meantime, roll out your puff pastry sheet so that it fits into a tart pan.  Push it into the tart pan to remove any air gaps and let the excess hang over the pan.  Then take your rolling pin and roll it across the top of the tart pan to trim the dough.  Next, evenly sprinkle your grated Gruyère in the pan and gently press it down.  Now, arrange your tomatoes on top in what ever cool pattern you like.  Season with a bit of salt and pepper, if you wish, and place it in the oven.  Bake for about 40 minutes, then remove to a cooling rack.  This can be served hot or at room temperature.

Saturday, March 2, 2013

Don't be Afraid to Cook Your Own Steak


The finished product. This was medium well, which is how I like my rib eyes.  By the way, it was tender and delicious and was one of the best steaks I have ever had.  Photo by Rob Robitaille
Steak lovers are fiercely loyal.  They like such and such steak done such and such...and so should you.  I myself am a steak lover and also have these feelings.  I love rib eyes.  They are a nice size, have plenty of fat, and are very tender.  I like mine medium well.  I think the flavor is better and they are more tender done more toward the well end of the spectrum.   However, I draw the line at telling you which steak is best and how it should be cooked.   One of my buddies likes his rib eye cooked just enough to heat it up and get some grill marks.  I don't like mine that way, but he does and that is really all that matters.  Because there so many opinions of how to cook steaks, some people feel overwhelmed and never cook them at home because they overhear steak fans going into great detail on how to do it.  It doesn't have to be that way and you don't have to be an expert to cook a great steak the way YOU like it.  If you start with a good steak and follow some simple guidelines, you will soon be cranking out steaks that rival, and in many cases exceed the quality of a good steak house.  This post will show you how to cook a rib eye similar to how you would get one at a steak house.

Selecting the right steak

Most meat counters offer rib eyes cut to about one inch, which will work fine for this.  If they are thinner, then you will have a very well done steak by the time you get a nice crust on the outside.  If they are thicker than that, that's okay.  It will take a bit longer to cook and will be a lot more to eat.  The most important thing to look for is brightly colored meat with no dark patches, that indicate is has been sitting for a while.  Next, make sure it has a lot of fat marbled into the meat.  Remember, fat is flavor and will make for a really tender steak.  Typically, if you follow those rules, you should have an excellent steak experience.

Prep the steak

Regardless of whether or not you will be making the steak right away, unwrap it and salt it. I know what you are thinking, but it won't dry it out.  Well...it will in a sense, but in a good way.  It serves two purposes.  First, it gives the salt time to penetrate the meat a bit and it helps remove some water, which will enhance the beef flavor.  The fat in the steak will keep it moist and tender.

When you are going to make the steak, remove it from the refrigerator and unwrap it.  If you like some pepper, now is the time.  Let the steak come up to room temperature.
My rib eye ready for the pan.  Note the fat marbled into the meat.  Photo by Rob Robitaille


Cooking the steak

I have been cooking steaks for years.  My all time favorite method is to grill them over oak logs, which is very time consuming, but my goodness does it make a great steak.  My second favorite method is to sear them in a heavy pan on your stove or cook top.  Stay away from non stick because we are going to be using a lot of heat.  I have an All-Clad pan that I like, and I also have several cast iron pans that I also use.  To be honest, the All-Clad works great and is on the top of my stack of pans, which is why it gets the most use.  Put the pan on your highest power burner and fire it up.  You want the pan smoking hot for this.  In the mean time, drizzle a bit of canola oil on the steak and rub it in to both sides.  This will help the steak get a nice crust.   I should probably mention that this will make quite a bit of smoke, so a good vent hood is important.   When the pan is really hot, put the steak in.  Resist the urge to poke or prod at the thing.  I should also mention that the steak is stuck to your pan right now.  Don't worry, it will release once the crust starts to form.  (This is an especially valuable piece of information when you are cooking chicken since chicken is so delicate and tends to shred if you try to move it around too soon.)  After three or four minutes you can take a quick peek under the steak to see how it looks, once it has a nice brown crust, you can flip it.  Cook it for roughly the same amount of time until it is done.
This is the crust you are looking for.  Photo by Rob Robitaille


Knowing when it is done

The best way is by feel.  Get in the habit of poking the steak with your finger somewhere toward the center.  It takes practice, but after you do a few of them, you will be able to tell.  If the meat dents and the indentation of your finger does not pop back up, it is on the rare range (give or take).  If it feel firm, but but yields and your finger does not leave an indentation, you are in the medium range (give or take).  If it feels very firm and doesn't yield much, it is more on the well done range (give or take).  When I say "give or take", I mean that it is not an exact science.  Also, different cuts feel different when they are the same "doneness".  A rib eye is more yielding than a strip steak.  A strip steak will always feel more done than a rib eye.  You just come to know these things with practice.  How you like your steak done is entirely up to you. you may find that you like different steaks done differently.  I do. I like rib eyes medium well, my strip steaks medium, and filet mignon rare to medium rare.  You will find that, if you start with a really good steak, and you miss the mark on how you like it done, you will probably still enjoy your steak experience.  If it is under done, you can always throw it back on the heat.  If it is too done to where you just can't eat it, then you need to come up with a plan B.

When it is done

When your steak is done, remove it from the pan to a warm heavy plate and ignore it for about 5-7 minutes.  This is referred to as letting the steak rest.  If you would cut into it right now, the juice would be pushed out and you would be eating a dry steak.  Now is the time to finish the steak with a pat of butter or compound butter like Kraueter Butter.  It also gives you time to clean up your pan.*

Completing the menu

Steak goes good with a lot of things: salads, creamed vegetables, potatoes, etc.  I personally like creamed greens, like kale, chard or napa cabbage, during the cold months and salads in the warmer months.  Red wine is great with a steak, so is beer.  Whatever wine or beer you like with it is up to you.  If you aren't sure, my advice is to not be afraid to go with something with a bit more body to stand up to the boldness of the steak.  All that is left to do is dig in.

Enjoy!

* The best way to clean a heavy seasoned pan, such as cast iron, is to scrub it out when it is still hot with a stiff bristled, long handled brush under hot water, then dry it with some paper towels.  Never use soap.  If that thought bothers you, just think of it as you would your grill.